It’s time we discuss another traffic source today, namely MGID. You may have noticed a post about the amazing 25% deposit bonus we could offer with them. If not, make sure to check it out. Absolutely worth it. So, what works best for the push and native traffic of MGID? Isn’t it obvious with the examples even they provide? Nutra? Gaming? Any mainstream stuff?
To the point – how to set up Sublime Revenue with MGID for conversion tracking? Simple. Here it goes…
- First things first – you need to sign up!
- When you log in, please navigate to the ADVERTISE page. There you will notice the button you need to click in order to create your first campaign.
 Click that and start filling in these key important stuff:
– campaign name – name well like we mentioned previously here. In order of segmentation, especially when narrowing down and scaling up your campaigns.
– campaign type – in this case I picked product promotion
– campaign category – in this case I pick WORLDWIDE COUSINES sub-category under FOOD AND DRINK category. Yay! We will be promoting contactless healthy food delivery because of the COVID-19 scare and madness! Guess how that will work! Great! It is nothing new to the market. You most probably ordered food online, too. Right? Right!?
– campaign language – in this case I picked Russian as the offer I am going to run is RU oriented and works especially well in Moscow and St. Pete(rsburg).
– available targetings – read what offer says and pick select the target audience. It is wise to not target the whole target audience at once. Do it on segments to track performance better. In this case I will target only iPhone users from Moscow, whose browser language is Russian. I may want to create a separate campaign per connection (Wi-Fi and carriers separately) and also the same thing for Android users – of course you split each like iPhone Wi-Fi, Android Wi-Fi, iPhone Carrier X, Android Carrier X, iPhone Carrier Y, Android Carrier Y, etc. You will quickly get an estimation of your reach above the targeting options when done and here is what I ended up with…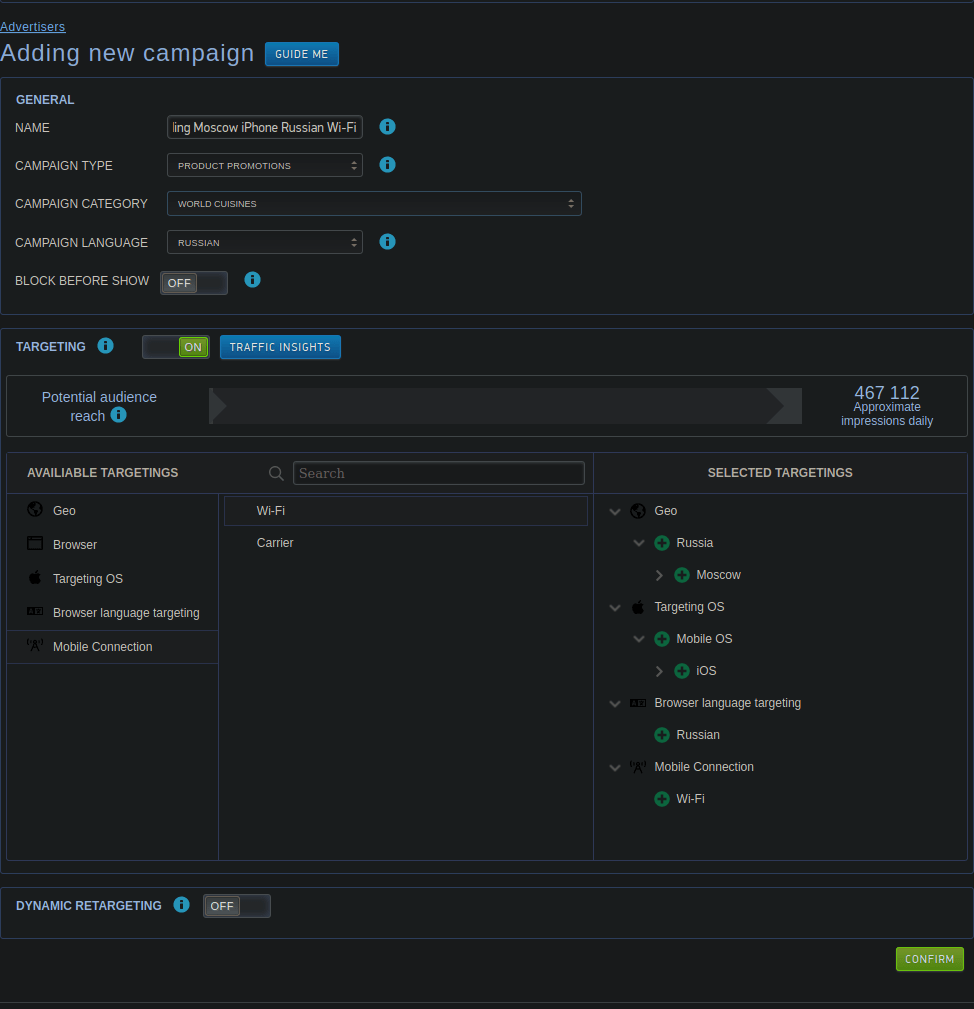 Quite nice! So let’s click on that green CONFIRM button and…
- What comes next is also important, so make sure to follow the gist of what is being done. Make sure to:
– set schedule (you may not want to target sleeping people, not hungry people, etc.).
– the end of the previous line looks like a… 🙂 penis, so set limits based on your budget and campaign goal.
– disable all tracking tags unless you need them – I prefer to track at Sublime Revenue, so not using any GA (Google Analytics, but custom tags, which are being removed from current page as they will be added in the ad URLs as shown a bit later.
– enable conversion tracking and set it up to use S2S Postback
– set expected CPA to about 20% – 30% of what offer pays as you want to profit.
Here is what it looks like for me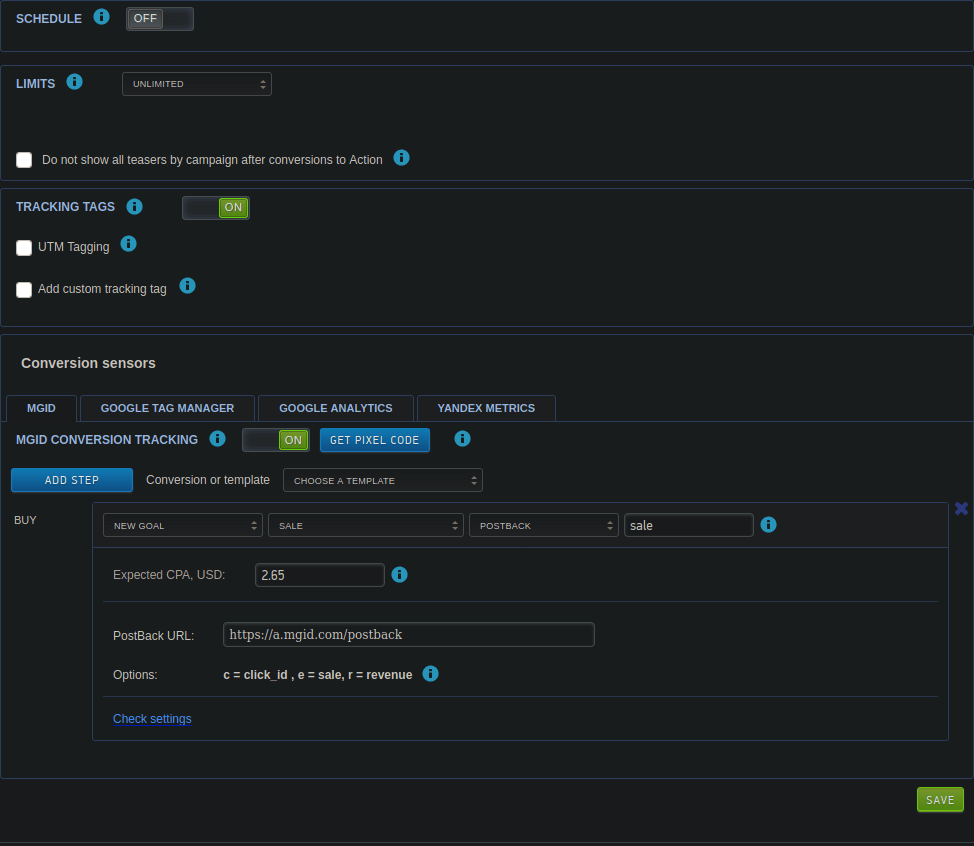 Well done!
- Now copy the postback URL provided on that page and head to the offer page on Sublime Revenue to add the postback URL. Here is how it looks for me having in mind our tokens and the parameter names mentioned on the create campaign page with MGID…
 Please remember to have the postback turned ON and saved like shown on the image above – add the question mark to begin query string and enter the parameters provided with our tokens as their values like so… ?c=[external_clickid]&e=sale&r=[payout_USD] but modify the e parameter value from sale to whatever your tracking name is. It is very important to add this value of the e parameter. You can also enter the campaign ID there as suggested in the MGID docs, but you may want to just enter the conversion goal name as I suggest here in case you run many campaigns and would like to avoid ending up with too many postback settings and setting this up every time. Do whatever works best for you! It would always be the best option. Every time!
- Head back to MGID and click the green SAVE button to continue… Now this new notification pops up…
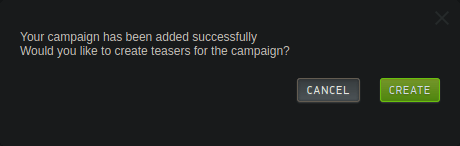 Now it’s time to click the CREATE button and start adding your ads. Here is what mine looks like…
 So we then set title with something cool like… Are you hungry? Entering “Вы проголодались?”
Then we go to set our bid according to our budget and needs and most importantly the tracking URL, so we are now back at the customization tool tab at Sublime’s offer page. Click that and the our harmonica will show up the tracking IDs, which need be filled with the tracking macros of MGID the way you need. Here is what I entered
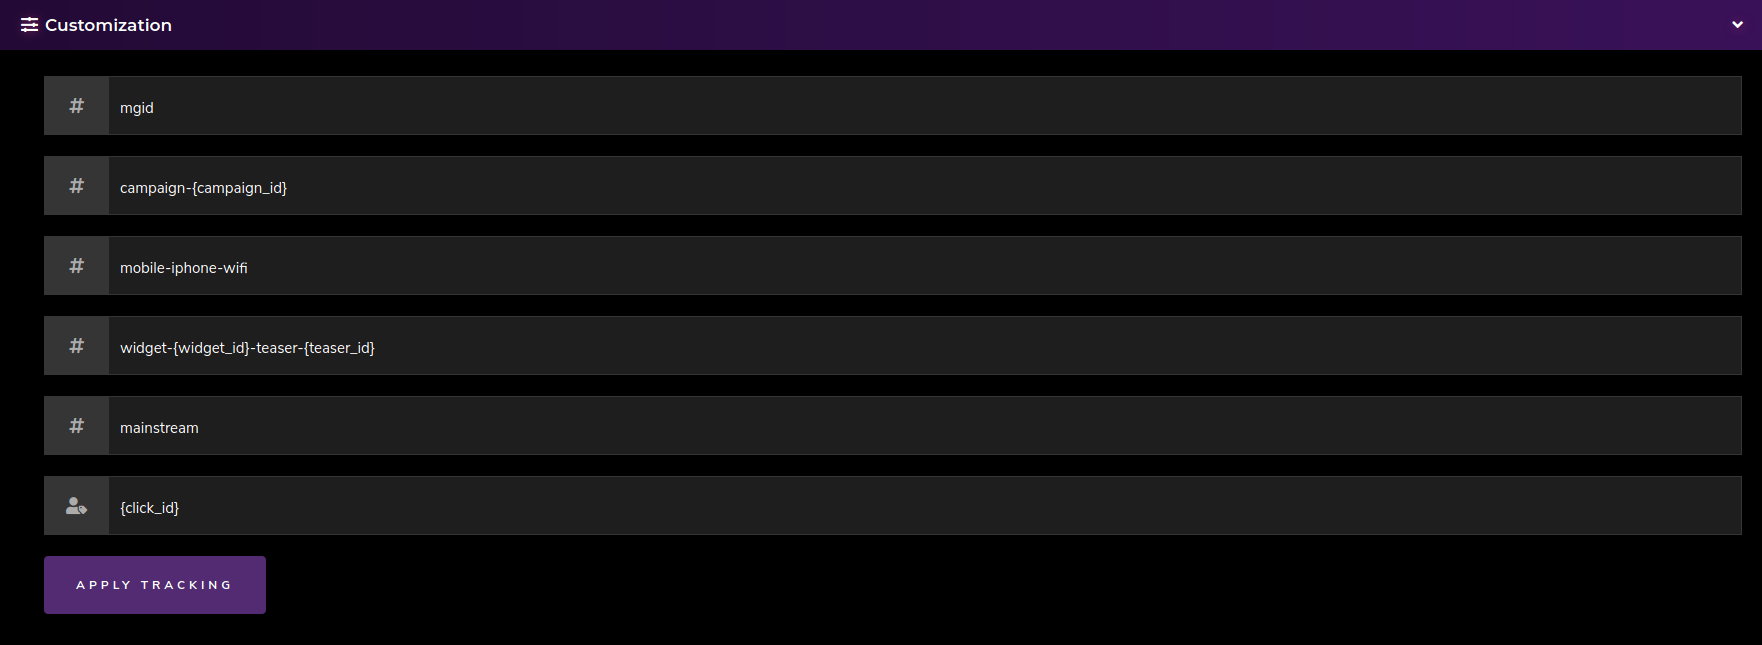 Why?
Why?
Sub ID – I use that for source name
Tracking ID 1 – I use that for campaign ID from the source
Tracking ID 2 – I use that for device type + device name (or OS) + connection (Yeah time to add more tracking IDs and actually show these stuff in our stats right?! A bit later on most probably). Noted.
Tracking ID 3 – traffic sources at MGID are with widgets and teasers. How this works a native widget may include several teasers. I want to know where the traffic comes from, so I can optimize the campaign or let it optimize automatically. It’s the age of automation after all. So, I use both {widget_id} and {teaser_id} tokens to find that out.
Tracking ID 4 – you may want to track category or something else. Feel free to use the {category_id} or anything else. I just entered “mainstream” as I do personally promote adult offers. People need more than food, right?
External Source Click ID – the most important part for conversion tracking with S2S postback here – enter {click_id} and nothing else.
Apply and get your URL to place at the MGID page.
- After all that is done click the green SAVE AND GO TO THE AD LIST button and wait…. No! Wait! Add more ads!
- Now you wait. Wait! No! We do not wait here! We promote other offers and watch our earnings grow with Sublime Revenue!
7 easy steps. This is how far your big revenue is. Not that far. Quite close, if you ask me. But who am I to tell!?
Good luck with your promotional campaigns!
Related Posts
Ad network you can trust... They say. Let's see about that. Not that I have any doubts, really. The place literally says in it's name what it offers. Exactly what we all need - traffic. And it's a shop. In fact I…
Some of you may already have heard about them, but hey, today we will be introducing another great traffic source - PopCash. It is really easy to integrate Sublime Revenue with them in several easy steps. Here it goes: Once signed up…
Greetings, friend! Already promoting Black Friday offers? You better be! Your commissions with us will be increased. More about this - here. In this very post, however, I will explain how to set up Sublime Revenue's conversion tracking with one of the…